> For the complete documentation index, see [llms.txt](https://algolytics-technologies.gitbook.io/algolytics/llms.txt). Markdown versions of documentation pages are available by appending `.md` to page URLs; this page is available as [Markdown](https://algolytics-technologies.gitbook.io/algolytics/scoring.one-platform/sidebar-menu-overview.md).
# Sidebar menu overview
Menu on the left side of the screen contains buttons for logging out of the scoring engine and for changing the language, and buttons directing the user to panels.
## Metrics
Scoring Engine Statistics This panel contains scoring engine statistics. On the top part of the panel shows the following two column charts: requests count and request average time. In addition, this panel contains code statistics showing the number of requests by scoring code / scenario.
## Scoring Codes
Scoring Code panel is designed to add, view and export scoring codes. It consists of two parts: the button "Scoring codes actions" for adding new scoring codes and a table with information about the added codes. Selecting Upload new model will open an area for adding new code. In the upper part of the area there is the Scoring code name field, where you should enter the code name and the Type field to select the language of the uploaded program. To select a code file, drag the file to the special field with a blue border in the middle of the area, or click this field and select the file. The added files are displayed at the bottom of the area in the table. By selecting the Import from JSON option, we load the models in the JSON file as described above. The last option is Export. After clicking, the JSON file with all models will be downloaded.
The table with information about the codes contains following columns:
* **Name** – code name
* **Type** – code type
* **Class name** – name of the class
* **User** – name of the user, who added the code
* **Created** - date of adding the code
On the right side for each code there is a drop down menu with four buttons: Export, Download and Delete, and Version. The Version button is used to set the code version, the Delete button removes the code, the Export and Download buttons respectively downloads the code in the .json format or the selected code format. After clicking on the code, 2 sections will appear: Statistics and Scoring Code Source. The Statistics section shows the code statistics: number of valid and invalid requests and maximum, minimum and average response time. Scoring Code Source shows the scoring code.
Scoring.One allows the implementation of models in four formats: Java, PMML, Python or R code. Your can read more about details in [Implementation of ML models](/algolytics/scoring.one-platform/tutorials/implementation-of-ml-models.md).
## Scenarios
Scoring Code management panel is designed to add and view scenarios. Here you can easily export, import or copy scenarios. Scenarios are saved in the YAML format. You can export all objects from the account into one file or export objects separately. To add a new scenario, click Create new scenario button, located on top of the panel. Next to the button, there is a drop-down list containing 2 buttons: export and import, that can be used to export or import a scenario. The import button opens a window, where user must drop a YAML file or click to upload one, and a button to overwrite existing scenarios. Below there is a table with information about the scenarios, containing following columns:
* **Name** – scenario name
* **User** – name of the user, who created the scenario
* **Created** – date of scenario creation
* **Modified** – date of last scenario modification
* **Deployed** – date of deployment
* **Version** – version tag assigned to the deployed version
To the right, for every code there is a drop-down list under Actions button. There are four actions available: **Open**, **Export**, **Delete** and **Copy**. **Open** button moves the user to the scenario [editor](broken://pages/jFVRJe9ZeXU3CLRXdM6o), **Export** button export scenario to YAML file, **Delete** button deletes the scenario and **Copy** button makes a copy the scenario.
After clicking a scenario name and then clicking on a gray METRICS field at the bottom of a screen, a scenario statistics appear. There are six metrics listed: number of correct and incorrect requests, maximum number of requests per second, maximum response time, minimum and average response time.
## Forms
Forms panel is designed to query scoring codes and scenarios. The panel contains a drop-down list of scoring models, scenarios. After choosing a model/scenario, fields corresponding to model/scenario input variables will appear below. To query a model/scenario, enter values of variables info the proper fields, and click Query button. Results of the query appear in the Result panel.
## Scoring Results
This panel is designed to browse results of queries. Results are presented in 5 categories, depending on result type (Scoring model, Scenario, Pmml model, R model, Python model). Category can be chosen through a drop-down list, located on top of the panel. For each category the panel contains a table with information about queries, containing following columns:
* **Name** – model/scenario name
* **Type** – model/scenario type
* **User** – name of the user, who created the query
* **Request** – input data of the query
* **Begin time** – start time of query execution
* **End time** – end time of query execution
* **Result** – result of the query
* **Version** – model/scenario version
* **Error** – information about an error (if occurred)
### Results interpretation
The Browse Scoring Result panel displays the processing logs of current queries (the panel shows the last 100 queries, and all processing records are saved in the database and stored for X days).
Logs contain sections:
* **Request Data** - this section contains the query data.
* **Result** or **Error** - this section contains the returned result or error message
* **Intermediate Results** - contains the complete processing log of the query, a list of all graph nodes that were executed along with the values of the variables created or modified within them. Each node also includes a timestamp indicating the start and end of processing. Node names can be defined by the user (the "Custom Name" field in the node settings).
Note that FORMS panel presents only input and output data, which may by not enough for debugging purposes.
## Internal Data
This panel is designed to adding CSV data. To add a new data, click Internal data actions button, located on top of the panel. Bottom to the button, there is a drop-down list containing 2 buttons: Load a CSV file and Create collection. To add a new data, click Internal data actions button, located on top of the panel. Bottom to the button, there is a drop-down list containing 2 buttons: Load a CSV file and Create collection. After selecting Load a CSV file, the Scoring Collection name field will appear in the upper part of the area, in which you should select the Colletion name to which you want to load the file. To select a CSV file, drag the file to the special field with a blue frame in the middle of the area or click this field and select the file. By selecting the Create Collection option in the upper part of the area, the Scoring Collection name field will appear, in which you should enter the Colletion name you want to create for storing CSV files. To select a CSV file, drag the file to the special box with a blue border in the center of the area, or click this box and select the file.
You can also use an API to upload your local data to the Scoring One
{% code overflow="wrap" %}
```markup
curl --http1.1 'https://demo.scoring.one/api/internaldata/collections/create/?fileName=.csv&indexes=,true;,false' -H 'Authorization: Bearer ' -F 'file=@"/.csv"'
```
{% endcode %}

## Connectors
Connectors panel allows you to define connections to external databases and event brokers. To create a new connection, click the **CREATE** button at the top of the panel. An interactive dialog box will open and walk you through the configuration process. See below for a sample Kafka connection configuration:
**Step 1:** Select **Kafka** as the connector type.
**Step 2:** Fill out connector properties. Click **'See more'** for a complete list of configuration options available in the Apache Kafka docs.
**Step 3:** Click **CREATE** to confirm. The new connection will appear in the list. You can manage it (edit, delete).
{% hint style="warning" %}
Connectors management (viewing and editing) is restricted to the Workspace Owner. All other workspace members are limited to listing and selecting connections for Trigger setup purposes.
{% endhint %}
## Triggers
Triggers enable automated scenario execution. To create a new trigger, click the **CREATE** button at the top of the panel. An interactive dialog box will open and walk you through the configuration process. See below for a sample Kafka trigger configuration that starts a scenario when an event is received:
{% hint style="info" %}
Note: ensure a Kafka connection has already been created in the Connectors panel.
{% endhint %}
**Step 1:** Select **Kafka** as the trigger type.
**Step 2:** Fill out trigger properties. Click **'See more'** for a complete list of consumer configuration options available in the Apache Kafka docs.
**Activation settings** map individual Kafka topics to the specific scenarios to be triggered. You can define one or more mappings (this supports many-to-many relationships, where one topic can trigger various scenarios and vice versa). To create a mapping pair:
* select scenario to be executed from dropdown menu and click **new topic**
* new dialog box will open. Fill out **Topic name,** select **Value type** (json, string, avro) and **SAVE**.
* add the configuration by clicking the **'+'** button. Once all mappings are added, click **CREATE** to complete the trigger creation process.
* The new trigger will appear in the list. You can manage it (pause, resume, delete, edit).
## Workspaces
A workspace is a dedicated container for resources that provides logical isolation between objects created within **ScoringOne** across different projects.
**Collaboration and Management**
Each user is assigned a non-deletable **"Default" workspace** and has the ability to create additional custom workspaces. Workspaces also enable resource sharing among other **ScoringOne** users. Access to a workspace can be granted to other users using one of the following permission levels:
* **Viewer:** Provides read-only access without the ability to modify resources or execute scenarious.
* **Editor:** Grants permissions to manage, modify, and run objects within the workspace (excluding connectors management).
See below for a sample workspace creation and managment:
* Select "Workspace" from the sidebar menu, enter the workspace name, and click the "+" button
* The new workspace will appear in the list. To share your workspace click  button, new dialog box will open. Enter the **user name** and select a **role** (Viewer or Editor). Click the **'+'** button. Once the user is added, click **Save** to confirm.
* Switch between workspaces by selecting one from the list. Use the Search bar to refine the list if needed. Clear the filter to view all available workspaces and make a new selection.
**Workspace ID (query workspace scenario via API)**
To query a scenario within a non-default workspace via the API, you need to add the "*?**ws**={Workspace ID}"* parameter to the query URL.
\
For example:
\
\&#xNAN;***\&ws=6993308e8dafd63aefc6a992***
\
To get the **Workspace ID**, click the button next to the workspace's name. This will automatically copy the ID to your clipboard.
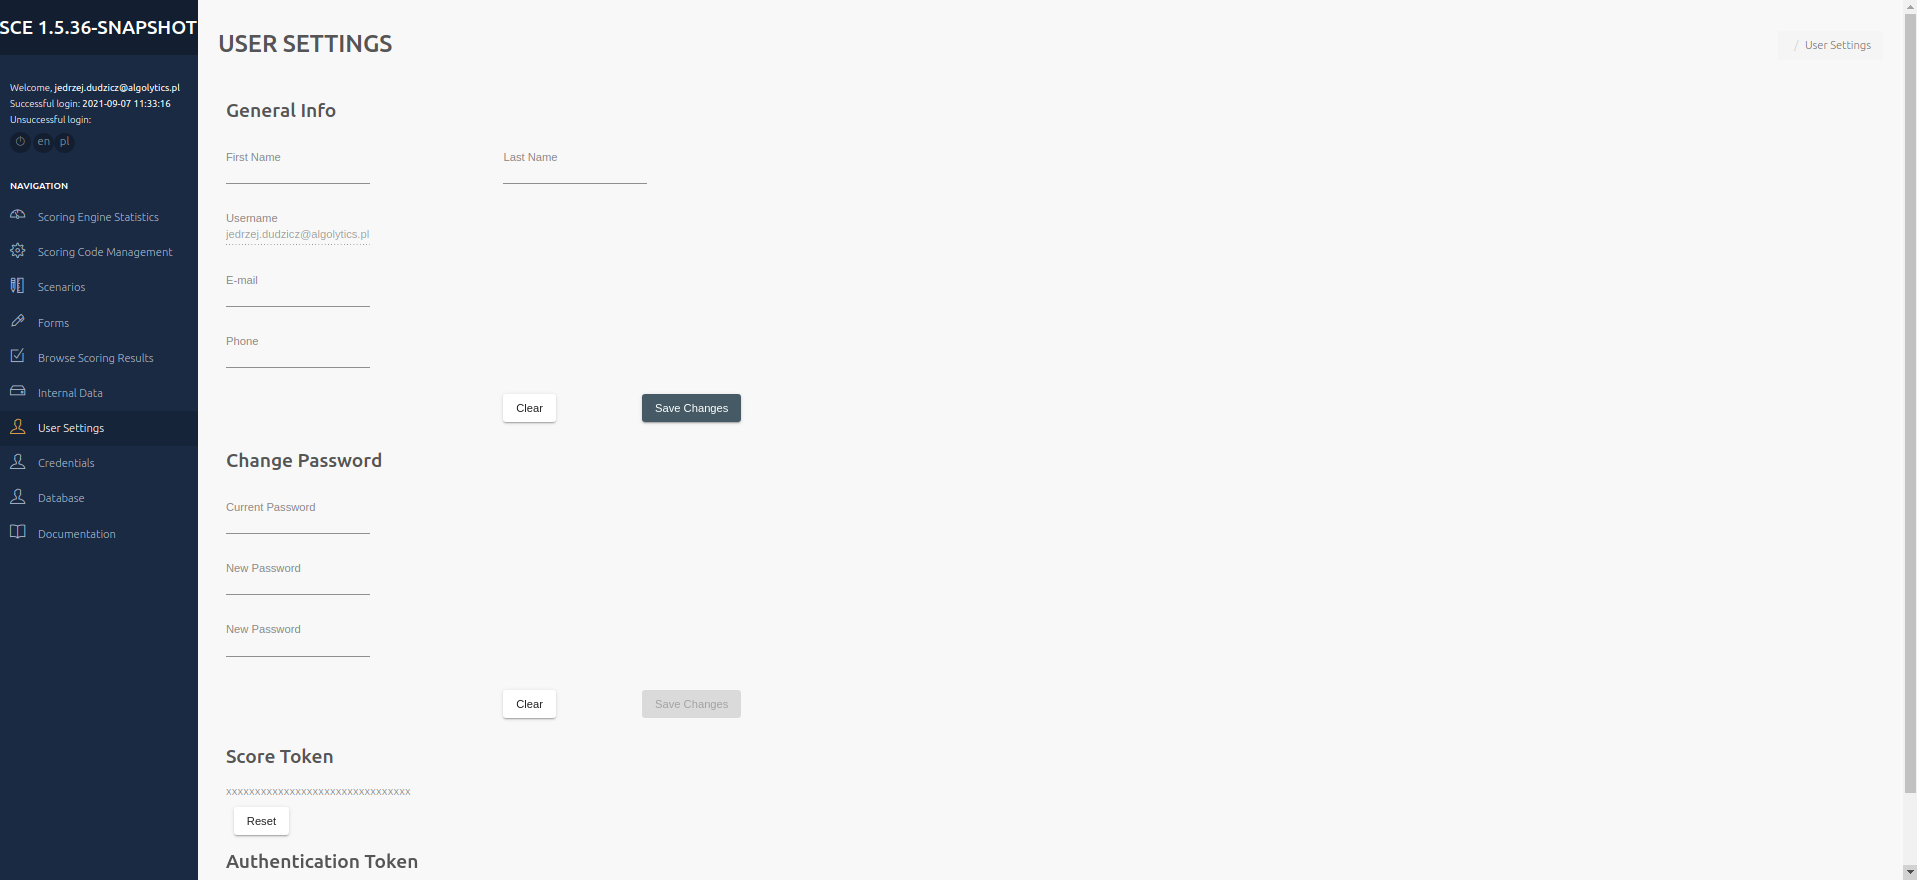
## User Settings
This panel is designed to manage user data. The General Info section is at the top. The user name is displayed. It is possible to change the name, surname and telephone number by entering it in the gap and confirming with the Save Changes button. To reset unsaved information, press the Clear button. In the middle there is a part of the Change Passoword, To change the password, enter the current password and enter a new password and confirm it. Finally, confirm the changes with the Save Changes button. To reset unsaved information, press the Clear button. Under the Change Password section, I find the Score Token needed for the API. It can be reset with the Reset button. At the very bottom there is an Authentication Token.
## Documentation
Clicking Documentation button in the menu on the left side of the screen open the documentation in new window.
## Accounts (admin)
**(Available only for users with administrative privileges)**
Administrators can and delete new users.
## Activities (admin)
**(Available only for users with administrative privileges)**
Administrators can check activities of all users, including time of logging in and logging out.